Printers are cheap but they are still expensive enough to make some repairs worthwhile. There is a surprising number of parts in them, and every part is a potential failure point. The most common failure is a clogged print head. They are notoriously difficult to clean because of their microscopic nozzles. The first attempt should be to use the self-cleaning command, found in the printer properties dialog. If that fails, the print head will need to be removed and wiped with alcohol. Both the contacts and nozzles should be cleaned well, and avoid touching them after cleaning. If all that fails, consider replacing the print head.
Inkjet Printer Repair
One benefit of the cheaper models is having the print head on the cartridge, so buying a new cartridge usually fixes the problem. For others, buying a new print head can be expensive, and its usually better to buy a new printer.
Another failure point is the power cord. Turn off the power first, then check the cord for any obvious cuts or sharp bends. A cord that is twisted enough times can break internally without showing any signs of damage. Use the continuity checker on a multimeter to check for internal breaks. A battery and light globe can also be used for this test. Also check the sockets for bent or broken pins.
Check the power supply unit for any sign of smoke or melted plastic. This indicates that it has overheated and potentially failed. Fixing a power supply unit is best left to professionals. However, the cost is not worth it, and just like the print head, its usually better to buy a new printer.
Inkjet printers have a small sponge that soaks up excess ink from the print head. Eventually, the sponge fills up with ink, and this causes smudging due to the buildup of excess ink. The sponge can be can be replaced with some cotton wool but its a messy and difficult job.
Paper jams are a sign of trouble with the rollers that pickup and feed the paper through the printer. Over time, the roller rubber becomes hard and smooth. This can cause the paper to slip and jam. Rubbing them gently with a cottonbud soaked in alcohol, or even with fine sandpaper, may help them grip better.
Squeaking is caused by a lack of lubrication in the roller bearings. This can be fixed with some mineral oil, but getting it into the right spot is difficult. If too much oil is applied, it will find its way onto the rollers and smear the paper.
Unless the problem is simple to fix, its usually better to buy a new inkjet printer. Only the more expensive models justify the high cost of servicing and parts.
Tampilkan postingan dengan label how. Tampilkan semua postingan
Tampilkan postingan dengan label how. Tampilkan semua postingan
Senin, 17 Februari 2014
Minggu, 01 Desember 2013
How to reset the ink cartridge Canon PG 37 black
 If the black cartridge refills PG-37 where are you going to put on the printer you put a sign saying that the cartridge is empty or is not correct cartridge.
Esto no es por que no tenga tinta (ojo que tambien puede estar vacio) es que la impresora pixma no tienen un sensor para saber la cantidad de tinta que tiene, lo que hace es reconocer el cartucho que se te termino y avisarte que esta vacio al contar determinada cantidad de impresiones.
This is not because you do not have ink (note that also can be empty) is that the printer pixma not have a sensor to determine the amount of ink you have, what it does is recognize the cartridge that is over and warn you that this vacuum to have certain amount of impressions.
Para solucionar esto lo que hay que hacer es: To fix this you have to do is:
Cuando intentes imprimir y te sale el cartel de que no tiene tinta apreta durante 20 segundo el boton (depende el modelo de impresora cual boton, pude ser el de las hojas o uno que tiene dibujado un triangulo al reves) When you try to print and sign out the ink has not click the button for 20 seconds (depending on the printer model that button, I could be the leaves or one that has drawn a triangle upside down)
Cuando lo sueltes se borrara el nivel de tinta y podras imprimir tranquilamente. Be erased when you release the ink and you can print smoothly. Lo que de ahora en adelante no te va a decir nunca mas que cantidad de tinta tiene. What henceforth not going to say anymore that has ink. PERO PUEDES IMPRIMIR ! BUT YOU CAN PRINT!

Kamis, 28 November 2013
How to Resetting the maintenance count LaserJet 9000mfp 9000Lmfp
1. Turn the printer off.
2. Press and hold the 6 button, then press the power button to turn the MFP on.
3. When the three LEDs are on, release the 6 button.
4. "SELECT LANGUAGE" appears on the screen. Press and release the 3 button. "NEW MAINTENANCE KIT" appears on the screen.
5. Press and release the 6 button again.
2. Press and hold the 6 button, then press the power button to turn the MFP on.
3. When the three LEDs are on, release the 6 button.
4. "SELECT LANGUAGE" appears on the screen. Press and release the 3 button. "NEW MAINTENANCE KIT" appears on the screen.
5. Press and release the 6 button again.
Minggu, 24 November 2013
How to reset the protection counter of Epson Stylus TX410 and TX415 Resetter
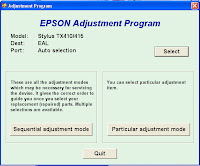
Epson Stylus TX410 and TX415 Adjustment Program
FIX PRINTER ERROR "parts inside printer end service life, waste ink pad counter overflow error"
FIX PRINTER ERROR "parts inside printer end service life, waste ink pad counter overflow error"
Please follow the steps below to reset the protection counter effectively.
- Double click AdjProg.exe.
- Click “Accept” button.
- Click "Select" button. and choose your printer model then click "OK"
- Click “Particular adjustment mode” button.
- Select on “Waste ink pad counter” and click “OK” button.
- Click on “Initialization” button and the program will reset the protection counter.
- Turn off the printer as a program instructed then turn on again.
- Click “Finish” button. and its done!
Jumat, 22 November 2013
How to Print Test Page Pattern Canon Epson and HP Printers without CPU or Computer
Here how to test page pattern for some Canon, Epson and HP printer without Computer or CPU. Prepare paper on printer before test the printers.
A. Test page pattern for Epson Printer
For C series: C41, C42, C43, C45, C58, C61, C62, C63, C65, C67, C79, C85, C86, C87, etc.
For R series: R210, R230, R270, etc.
3600 series and 3700 series
BJC 1000, BJC 2000, BJC 2100 SP, S100, S200
A. Test page pattern for Epson Printer
For C series: C41, C42, C43, C45, C58, C61, C62, C63, C65, C67, C79, C85, C86, C87, etc.
For R series: R210, R230, R270, etc.
- Push and hold paper/resume button and then push power button.
- Push and hold power button, and then push ink button until indicator lamp blink once, and then release both of them.
3600 series and 3700 series
- Turn on printer, Wait until power indicator lamp stop blinking, then push and hold power button and then open and close again cover panel 3 or 4 times repeatedly.
- Turn on printer , wait until power indicator lamp stop blinking then press power switch while opening the cover 5 times repeatedly then release switch button
- Switch on printer then press “cancel” and “color” at the same time
BJC 1000, BJC 2000, BJC 2100 SP, S100, S200
- Push twice on resume button
- Push 5 times on resume button
Rabu, 20 November 2013
How To fix Canon printers Error P22
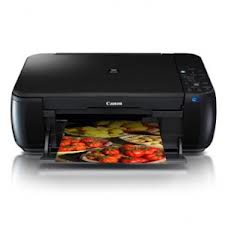
Canon printers Error P22 or P,2,2 is a scanner error.
Procedure 1:
Power off the printer
unplung the power cord
Wait 5 minutes
Plug in the power cord
Switch on the printer
Procedure 2:
If the printer is still under warranty, contact the Canon support.
Procedure 3:
The scanner unit or the logic board is defective.
Senin, 18 November 2013
How to Reset Photo Printer Canon PIXMA MP600
The printer Canon PIXMA MP600 is all-in-one canon printer like Canon MP500 but with improve features. This canon printer model provide 2.5 inch display and easy scroll wheel features that makes operation for this printer so much easier.This printer also provides features to printer directly from memory cards, digital cameras, Bluetooth devices, and camera phones. In the market this printer sold for $130.00
Other features for this all-in-one printer is easy to setup into your computer, provides wireless connection, easy to use, it’s quiet and it prints fast. On the internet I’ve found reset method for this Canon Pixma MP600 all-in-one printer, are reset counter and reset the printer to factory default setting.

Here the Manual Canon MP600 Printer (Reset Waste Ink Counter and Reset to Factory Setting).
1. Reset Counter MP600
Other features for this all-in-one printer is easy to setup into your computer, provides wireless connection, easy to use, it’s quiet and it prints fast. On the internet I’ve found reset method for this Canon Pixma MP600 all-in-one printer, are reset counter and reset the printer to factory default setting.

Here the Manual Canon MP600 Printer (Reset Waste Ink Counter and Reset to Factory Setting).
1. Reset Counter MP600
- Turn off the printer
- Press and hold the Resume Button, add a printer an indicator light green.
- Press and hold the Power Button, while hold Power button, release the Resume Button.
- While hold the Power Button, double click Resume button and then Release Both Buttons.
- Click Resume for Four times.
- Once you click Power, to confirm the selected action (reset counter absorber).
- Turn off the printers.
- Press the HsayaE button.
- Use the Easy-Scroll Wheel or the right/left arrow to select Settings, and then press OK button.
- Use the Easy-Scroll Wheel or the right/left arrow to select Device settings, then press the OK button.
- Use the Easy-Scroll Wheel (B) or the up/down arrow to select Reset settings, then press the OK button.
- Use the Easy-Scroll wheel or the up/down arrow to select Yes on the confirmation screen and then press OK.
- Press the HsayaE button to return to the HsayaE menu.
Sabtu, 16 November 2013
How to Reset Canon MP287 Printer error E08

FIX PRINTER ERROR "The Ink Absorber is Almost Full" When the canon MP287 is turned on, it will display error E08 on the LCD panel of the printer.
And if give print command, the computer will display error "The Ink Absorber is Almost Full".
How to Reset MP287 Canon error E08
Step1. Turn on Printer Canon MP287, LCD panel then will appear E08 error, and error "The Ink Absorber is Almost Full" will display on computer.
Step
2. Download the Resetter of canon MP287 NOW.
Step
3. Get printer in SERVICE MODE.
Step
4. Turn off the Canon MP287 by pressing the power button. Do not unplug the power cord.
Step
5. Press and Hold the STOP / RESET and POWER button.
Step
6. Remove the STOP / RESET but do not release the button POWER.
Step
7. press the STOP / RESET 6 times.
Step
8. Then release both buttons simultaneously. The Canon MP287 will be in Service Mode.
Step
9. LCD Panel MP287 will blank / dark and your computer will detect the new hardware. Ignore it ...
Step1
0. The next step Extract and Run Service Tool for canon MP287.
Step
11. menu -> absorber Clear ink counter select -> SET to the right.And Do the other steps on the tool.
Step
12. Printer Canon MP287 will be normal again.
Minggu, 10 November 2013
Know How to Reset Epson Stylus T11 printer adjprog

FIX PRINTER ERROR "parts inside printer end service life, waste ink pad counter overflow error"
Follow the below steps to Reset Epson Stylus T11 printer :
Step1-Connect the printer to the computer and you must have already installed the printer driver at your computer.
Step2-Download Epson Stylus T11 printer reset software here
http://www.ziddu.com/download/7560800/ReseterT11Working-16-Nov-2009.rar.html (size 541.82 KB)
Step3-Run the adjustment program Epson T11 with a double click on "Loader.exe",
Dont run "AdjProg.exe" because the program will not run if straight from the "AdjProg.exe"
Step4-Accept
Step5-Select the printer model(T11 or T10),Let the port be Auto Selection.
Step6-Then select to particular adjustment mode tab.
Step7-Next you will see a list written ----Adjustment----,----Maintenance----,---Appendix----,
In Maintanence list select Waste ink pad counter.
After that you will see two box(Main pad counter and Platen Pad)
"Check the used to counter check the maximum 7800 points, you can see it in the main pad counter.
If more or close to 7800 points that means the printer needs to be reset"
Initialization: used to reset or re-counter zerro the printer"
Select both check box and then select initialization tab below right side.
Then click Finish. Thats done...
Enjoy...
Senin, 05 Agustus 2013
Canon Error 5100 How to fix
There is really nothing quite as annoying as asking your expensive Canon MP printing device to print an important document and seeing an error code 5100 pop up instead of the neatly printed paperwork you need. Understanding the reason for the error code and what steps you should take to resolve the issue can have you back on track with your newly printed page-fast.
Error message: the LED light blinks twice (2xs) and displays: "Error 5100 An error occurred in the carriage encoder signal".
Lets march down the troubleshooting path and look at probable solutions and how to reset Canon error code 5100. The first thing that you should do with a printer error of any type is try to reset the Canon MP printer. Occasionally an error code is a matter of a crossed signal between the Canon ink jet printer and the computer. Rebooting the Canon pixma printer might fix the problem with no more fuss.
1) Clear debris from carriage head
Open the Canon printer and look closely for any debris such as small pieces of paper or dirt lodged inside. If such debris is found, remove it, plug Canon pixma back in and see if error code has cleared.
2) Lubricate the purge cap
If the Canon printer has excess dirt or dust you can use a damp lint free paper towel to gently clean the Canon printer. Once device is cleaned plug it back in and see if error code 5100 has cleared. If cleaning and clearing the device does not work then you may need to lubricate the purge cap.The purge cap is the sliding mechanism that the printer head parks into when it is not in use. To lubricate it you will need to remove the right panel from the devise. Once the panel is removed rub a little white grease along the sliders while taking care not to get any grease on the small wipers or the black caps. Once this is done, replace the panel, plug devise back in and see if the error code 5100 has cleared.
3) Paper Jammed
Odds are greatest a rogue piece of paper has nested itself in like a rat in a haystack. The solution is to remove all ink cartridges and hit it with canned air, or any other filtered air blower.
4) Set the ink cartridges properly
Less likely, and yet still possible is your ink cartridges need to be re-seated. If you follow the step above, after cleaning youll be re-seated the cartridges anyway.
Error message: the LED light blinks twice (2xs) and displays: "Error 5100 An error occurred in the carriage encoder signal".
Lets march down the troubleshooting path and look at probable solutions and how to reset Canon error code 5100. The first thing that you should do with a printer error of any type is try to reset the Canon MP printer. Occasionally an error code is a matter of a crossed signal between the Canon ink jet printer and the computer. Rebooting the Canon pixma printer might fix the problem with no more fuss.
1) Clear debris from carriage head
Open the Canon printer and look closely for any debris such as small pieces of paper or dirt lodged inside. If such debris is found, remove it, plug Canon pixma back in and see if error code has cleared.
2) Lubricate the purge cap
If the Canon printer has excess dirt or dust you can use a damp lint free paper towel to gently clean the Canon printer. Once device is cleaned plug it back in and see if error code 5100 has cleared. If cleaning and clearing the device does not work then you may need to lubricate the purge cap.The purge cap is the sliding mechanism that the printer head parks into when it is not in use. To lubricate it you will need to remove the right panel from the devise. Once the panel is removed rub a little white grease along the sliders while taking care not to get any grease on the small wipers or the black caps. Once this is done, replace the panel, plug devise back in and see if the error code 5100 has cleared.
3) Paper Jammed
Odds are greatest a rogue piece of paper has nested itself in like a rat in a haystack. The solution is to remove all ink cartridges and hit it with canned air, or any other filtered air blower.
4) Set the ink cartridges properly
Less likely, and yet still possible is your ink cartridges need to be re-seated. If you follow the step above, after cleaning youll be re-seated the cartridges anyway.
5) Clean the Timing film
The timing film is a thin piece of plastic which runs across the width of the devise below the drive belt. It has fine vertical lines running along it and if it becomes dirty then your printer will display an error 5100 message. To clean use a damp lint free paper towel and gently wipe it off. Once strip has been cleaned, plug the devise back in and see if the error message has cleared.
Corrupt printer driver results in Canon Error Code 5100
If you have gone through all this and still you have no joy, chase down the latest, greatest print driver and reinstall. Printer driver corruption while low on the odds list, can be quite vexing.
How to reset Canon Error Code 5100
There is a plan B however, it is at your own risk. Some clever Russian engineers have coded up Canon printer Resetters that can be downloaded. The software can create test patterns, cleaning, EEPROM dumps. Clearing waste counters and much more. And in these days of malware, I think more than twice about downloading free software from sources I dont completely trust.
If all of the above steps do not clear your printer of the error 5100 error then it is possible the logic board assembly or carriage motor has gone bad. If this is the case then you will need to either send the unit in for repairs or replace the machine.
The timing film is a thin piece of plastic which runs across the width of the devise below the drive belt. It has fine vertical lines running along it and if it becomes dirty then your printer will display an error 5100 message. To clean use a damp lint free paper towel and gently wipe it off. Once strip has been cleaned, plug the devise back in and see if the error message has cleared.
Corrupt printer driver results in Canon Error Code 5100
If you have gone through all this and still you have no joy, chase down the latest, greatest print driver and reinstall. Printer driver corruption while low on the odds list, can be quite vexing.
How to reset Canon Error Code 5100
- Turn off the printer
- Unplug the printer power cable
- Press and hold the power button, and restore the power (a strip with a switch makes this simpler*). Depending on your firmware, you may have to also press and hold the resume button, simultaneously. You may get a one buzz sound.
- While continuing to press the power button press the resume button twice, in short bursts.
- Release the power button.
- Again, depending on the firmware, you may have to press the resume button three more times, and then the power button once. If you got a single buzz before, you should get one again, indicating you have exited programming the firmware. The printer will then switch off.
There is a plan B however, it is at your own risk. Some clever Russian engineers have coded up Canon printer Resetters that can be downloaded. The software can create test patterns, cleaning, EEPROM dumps. Clearing waste counters and much more. And in these days of malware, I think more than twice about downloading free software from sources I dont completely trust.
If all of the above steps do not clear your printer of the error 5100 error then it is possible the logic board assembly or carriage motor has gone bad. If this is the case then you will need to either send the unit in for repairs or replace the machine.
Langganan:
Postingan (Atom)