Tampilkan postingan dengan label on. Tampilkan semua postingan

Rabu, 27 November 2013

Reset Ink Level on Canon Pixma iP1800 Canon Pixma iP1880 using iPtool software

I get this tutorial from fixyourownprinter.com forum to solve the ink level error in canon Pixma iP1800/Canon Pixma iP1880.  This problem usually appear after refilled the cartridge on the canon printer and ink level indicator showing the ink cartridge is empty although you have filled a cc Ink into the cartridge. And if the problem occur you cannot using your printer to print. The solution you must reset ink level on the printer if you want your computer work again.
If you have a problem like that you ca follow this tutorial to solve your printer  problem, here how:
  1. Turn of the printer and Disconnect the power cable to the printer.
  2. Press power button on the printer. While pressing the button connect the power cable to the power source (the power indicator will light in green)
  3. While still holding power button press resume button twice – orange blink and return to green.
  4. Release the power button, then the PC will recognize new cartridge installed (If the power indicator on the printer steady in green you continue to Steps 5)
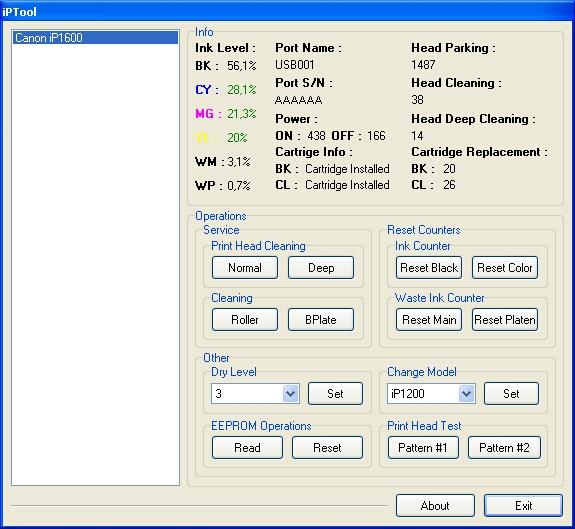
  5. Run the IPtools software, please await after this software detect your printer correctly or you can set the printer model on “Change Model” section.
    IPTool for Canon Printer
  6. Click “reset black and reset color” button to reset the ink level and Click “reset main and reset platen” to reset waste ink counter. After clicked the button you will see ink level of the cartridge on in the IPTol info has 100% and WP and WM has  set to 0. Click Exit on IPTool
  7. Turn off the printer and turn on again.
On the reset procedure above usually the problem found on steps 1-4 to make the printer steady light in green. On my experiment if steps 1-4 does not work  on your printer, you can use manual reset method for canon iP1700 before continue to steps 5.

Senin, 25 November 2013

Error E 91 or E91 on Epson printers


Error code E-91 means the waste ink counter is full. It had to be resetted in order to fix the problem.

For some Epson printers, the software SSC Utility can reset the counter.


Epson Artisan series Artisan 700, Artisan 725, Artisan 800, Artisan 835, Artisan 837, EP-901A


Epson B and BX series B1100, B1110, B300, B300DN, B310, B310N, B40W, B42WD, B500DN, B510, B510DN, B510N, B518DN, BX300F, BX305FW, BX310FN, BX525WD, BX600FW, BX610FW, BX620FWD, BX625FWD

Epson Stylus C series C20, C40, C41, C42, C43, C44, C45, C46, C58, C59, C63, C64, C67, C68, C70, C76, C77, C78, C79, C80, C82, C83, C86, C87, C88, C90, C92, C93, C94, C95, C97, C98, C99, C110, C120, C480, C560, C660, C670, C680, C777, C880, C888

Epson Stylus CX series CX1390, CX1500 ,CX1600, CX2800, CX2900, CX3100, CX3200, CX3300, CX3400, CX3500, CX3600, CX3650, CX3700, CX3800, CX3805, CX3810, CX3900, CX4000, CX4100, CX4200, CX4500, CX4600, CX4700, CX4800, CX4850, CX4900, CX5100, CX5400, CX5500, CX5505, CX5700, CX5900, CX6300, CX6400, CX6500, CX6600, CX6900, CX6900F, CX7300, CX7400, CX7450, CX8300, CX8400, CX8450, CX9300F, CX9400F, CX9500F

 Epson Stylus D series D68, D82, D88, D92, D120

Epson Stylus DX series DX3800, DX3850, DX4000, DX4050, DX4200, DX4250, DX4400, DX4450, DX4800, DX4850, DX5000, DX5050, DX6000, DX6050, DX7300, DX7400, DX7450, DX8400, DX8450

Epson Stylus EP series EP-801A, EP-803A, EP-901A, EP903A

Epson Stylus K and L series K100, K200, K300, L100, L200, L300 Epson ME Office Series ME2, ME20, ME30, ME32, ME-B40W, ME70, ME80W, ME82WD, ME200, ME300, ME320, ME340, ME360, ME510, ME520, ME530, ME535, ME560, ME570, ME600F, ME620F, ME650N, ME650N, ME900WD, ME960FWD, ME1100

 Epson NX Series (See TX Series) NX100, NX110, NX111, NX125, NX127, NX200, NX205, NX210, NX215, NX220, NX300, NX305, NX310, NX315, NX400, NX405, NX410, NX415, NX420, NX430, NX510, NX515, NX620

 Epson PictureMate (PM) Series PM100, PM210, PM215, PM225, PM235, PM240, PM250, PM260, PM270, PM280, PM290, PM310, PM500, PM-A820, PM-A890, PM930C, PM-A950, PM-A970, PM970C, PM-G800, PM-G820, PM-D800, PM-3500C, PM,G4500, PM-G5000

Epson PX series PX600W, PX600FW, PX640, PX650, PX659, PX660, PX700W, PX700W, PX720WD, PX800FW, PX800FWD

Epson R series R200, R210, R220, R230, R240, R245, R250, R260, R265, R270, R275, R280, R285, R290, R295, R300, R310, R340, R350, R360, R365, R380, R390, R395, R520, R800, R1380, R1390, R1400, R1800, R1900, R2400, R2800, R3880, R4880, R7880

Epson RX series RX420, RX425, RX430, RX500, RX510, RX520, RX530, RX560, RX565, RX580, RX585, RX590, RX595, RX600, RX610, RX615, RX620, RX625, RX630, RX640, RX650, RX680, RX685, RX690, RX700 297

Epson S series S20, S21, S22

Epson Stylus Photo series: P50, P60, 870, 890, 1270, 1290, 1390, 1400, 1410, 1420, 2000P, 2100, R7880

Epson Stylus Pro Stylus Pro 7000, Stylus Pro 9000, Stylus Pro 9600

Epson Stylus SX series SX100, SX105, SX106, SX110, SX111, SX115, SX117, SX125, SX130, SX200, SX205, SX210, SX215, SX218, SX230, SX235, SX400, SX405, SX410, SX415, SX420W, SX425W, SX430W, SX435W, SX510W, SX515W, SX525WD, SX550W, SX600FW, SX610FW SX620FW

Epson T Series T10, T11, T13, T20, T20E, T21, T22, T23, T24, T25, T26, T27, T30, T31, T33, T40W, T42W, T42WD, T50, T59, T60, T80W, T1100, T1110

Epson TX series TX100, TX101, TX102, TX103, TX105, TX106, TX109, TX110, TX111, TX115, TX116, TX117, TX119, TX120, TX121, TX125, TX135, TX200, TX205, TX209, TX210, TX219, TX220, TX230, TX235, TX300F, TX320F, TX400, TX405, TX408, TX409, TX410, TX415, TX419, TX420, TX420W, TX510FN, TX550W, TX560WD, TX600F, TX600FW, TX600W, TX610FW, TX620FWD, TX640, TX650, TX659, TX660, TX700W, TX700FW, TX720WD, TX800W, TX800FW, TX820FWD

Epson WorkForce series 30, 40, 42, 60, 310, 315, 323, 500, 600, 610, 615, 620, 625, 630, 635, 1100, WF-7011, WF-7015, WF-7511 WF-7515, Pro-WP-4511, Pro-WP-4521, Pro-WP-4530, Pro-WP-4540

Epson: L100, L200, P50, P60, T50, T60, Pro 7000, Pro 9000, Pro 9600

Minggu, 13 Oktober 2013

C6400 6000 on Kyocera Mita KM1500

Almost all kyocera Mita products display error message C6XXX whenever a problem is detected in fixing temperature or fixing unit. C6000/C6200/C6050 and C6400 all are related to fixing unit. Service manual states that possible causes are as below:
C6000 & C6050
  • Poor contact in the thermistor connector terminal.
  • Thermistor installed incorrectly.
  • Thermal cutout triggered.
  • Heater lamp installed incorrectly.
  • Broken heater wire.
C6020
  • Shored thermistor
  • Broken heater control circuit on the power supply board.
C6400
  • Poor contact in the connector terminals. Check the connection of connectors CY7 on the engine board and CN2 on the power supply board.
  • Defective power supply board.
  • Defective engine board.
Sometimes only an unstable power source is the cause of these error messages.
How to reset:
  1. Press the Stop/clear (red) key, Start (green) key and the left copy exposure key in the order presented and hold them down.
  2. Release the keys and than press Stop/clear key again (within few seconds).
  3. Using the copy exposure adjustment keys or the Zoom +/- keys go to mode U163.
  4. Press the start key.
  5. If prompted (Im not sure) confirm that you want to reset the fixing data.
  6. Here you go.

Minggu, 06 Oktober 2013

Reset the Ink Level on a Lexmark Printer

Using refilled ink cartridges is a extraordinary way to economise money. Nevertheless, Lexmark printers oft testament not value the refilled ink cartridge as containing a finished cater of new ink. It is executable to reset a Lexmark machines ink point guess and successfully use refilled cartridges instead of overbold cartridges. Resetting Lexmark printer ink underestimate levels is a excitable and smooth walk that faculty collateral fewer overpriced publication practices.

Manual

Use The Machine Solvent Central Option

1. Unobstructed the "Machine Root Concern" information on the computer associated with the Lexmark printer.
2. Select the "Maintenance" tab in the "Machine Result Tract."
3. Superior the "Position a new machine cartridge" alternative.
4. Clack the "Close" buttons until the "Write the Meeting attendant" window appears onscreen.
5. Select the "Photo" fasten. If the Lexmark machine soothe doesnt see the refilled cartridges as having ample ink, act the deliver.


Resetting the Cartridge Alternative

1. Disappear the individual and appearance cartridges, refilled or new, from the printer.
2. Play the machine off using the state secure. Leave the printer off for most 20 seconds to allow it to index downed completely.
3. Transform the printer on using the noesis fix. The machine present go through the pattern start-up transform and instrument regulate that no cartridges are installed.
4. Echo Steps 3 and 4 quint present. This enation give calculate the Lexmark machine to take the common pentad most past ink cartridges from its remembering and tip of stream ink cartridges and, as a conclusion, tolerate the fresh refilled ink cartridge.