You can clear some of the error messages that appear on a Canon MP495 just by using the red “stop / reset” button on the printer. This is especially effective for the messages you receive when at least one of the ink cartridges are empty.If the printer displays that an ink cartridge is empty, simply press and hold the red “stop / reset” button on the printer for six seconds. The printer should continue printing, and use any of the remaining ink in the cartridge.If the printer thinks that both cartridges are empty, you will receive a second error message, and you will need to hold the button for another six seconds.If the circuitry on the cartridges is actually damaged, unfortunately, this process will not work.
Senin, 19 November 2012
Canon MP230 – Error Messages
If there is a problem with the MP230, a message light will flash to warn you. Count the number of times it flashes to understand what the actual error is:
Two flashes: Machine is out of paper / paper does not feed
Three flashes: Paper jam
Four flashes: The cartridge is not installed properly
Five flashes: The cartridge is not installed properly / appropriate cartridge is not installed
Seven flashes: cartridge is not installed in the correct position
Eight flashes: Ink absorber is almost full.
Thirteen flashes: The remaining ink level cannot be detected
Fourteen flashes: The cartridge cannot be recognised
Fifteen flashes: The cartridge cannot be recognised
Sixteen flashes: The ink has run out
Canon MP230 – Clearing Error Messages
Many of the error messages that appear on a Canon MP230 printer can be cleared by using the red “stop / reset” button. This is especially true for the messages you receive when at least one of the ink cartridges are empty.If the printer displays that an ink cartridge is empty, simply press and hold the red “stop / reset” button on the printer for five seconds. The printer should continue printing, and use any of the remaining ink in the cartridge.
If the printer thinks that both cartridges are empty, you will receive a second error message, and you will need to hold the button for another five seconds. If the copper circuitry on the cartridges are actually damaged, unfortunately, this process will not work.
If the printer thinks that both cartridges are empty, you will receive a second error message, and you will need to hold the button for another five seconds. If the copper circuitry on the cartridges are actually damaged, unfortunately, this process will not work.
Canon MG5250 – Error Messages
Sometimes the Canon MG5250 will just stop in the middle of printing, and display an error message. The following information should help you diagnose the problem with the printer
U041 = The ink cartridge may have run out, replacing the cartridge is recommended.
U043 = The following ink cartridge cannot be recognised.
U051 = Print head is not installed. Install the print head.
U052 = The type of print head is incorrect.
U071 = More than one ink cartridge of the following color is installed.
U072 = Some ink cartridges are not installed in the correct place.
U130 = The remaining level of the ink cannot be correctly detected.
U140 = The following ink cartridge cannot be recognised.
U141 = Appropriate ink cartridge is not installed.
U150 = The following ink cartridge cannot be recognised.
U163 = The ink cartridge has run out.
Canon MG3150 – Error Messages
A short list of possible error messages for the Canon MG3150 and their descriptions:
E, 0, 2 = The machine is out of paper / paper does not feed.
E, 0, 3 = Paper jam.
E, 0, 4 = The cartridge is not installed properly.
E, 0, 5 = The cartridge is not installed properly / appropriate cartridge is not installed.
E, 0, 6 = The paper output cover is open.
E, 0, 7 = Cartridge is not installed in the correct position.
E, 0, 8 = Ink absorber is almost full.
E, 1, 0 = Loaded paper is not compatible with automatic duplex printing.
E, 1, 2 = Cannot print the contents on CREATIVE PARK PREMIUM.
E, 1, 3 = The remaining ink level cannot be detected.
E, 1, 4 = The cartridge cannot be recognised.
E, 1, 5 = The cartridge cannot be recognised.
E, 1, 6 = The ink has run out.
E, 1, 7 = The front tray is closed.
E, 2, x = An error regarding network setup has occurred.
E, 3, 0 = The size of the original cannot be correctly detected or the document is too small when the Fit-to-Page copying is selected.
E, 3, 1 = The machine is not connected with the computer.
E, 4, 0 = The protective material for the cartridge or the tape remains attached.
E, 5, 0 = Scanning the print head alignment sheet has failed.
Canon MG2150 – Error Messages
If the Canon MG2150 stops printing and displays an error message, the following information should help you diagnose the problem with the printer.The led screen on the printer will flash a letter E and will then be followed by two numbers:
E, 0, 2 = The machine is out of paper / paper does not feed.
E, 0, 3 = Paper jam.
E, 0, 4 = The cartridge is not installed properly.
E, 0, 5 = The cartridge is not installed properly / appropriate cartridge is not installed.
E, 0, 6 = The paper output cover is open.
E, 0, 7 = cartridge is not installed in the correct position.
E, 0, 8 = Ink absorber is almost full.
E, 1, 2 = Cannot print the contents on CREATIVE PARK PREMIUM.
E, 1, 3 = The remaining ink level cannot be detected.
E, 1, 4 = The cartridge cannot be recognised.
E, 1, 5 = The cartridge cannot be recognised.
E, 1, 6 = The ink has run out.
E, 1, 7 = The front tray is closed.
E, 3, 0 = The size of the original cannot be correctly detected or the document is too small when the Fit-to-Page copying is selected.
E, 3, 1 = The machine is not connected with the computer.
E, 4, 0 = The protective material for the cartridge or the tape remains attached.
E, 5, 0 = Scanning the print head alignment sheet has failed.
Canon MG2150 – Clearing Error Messages
Several error messages that stop a Canon MG2150 from printing can be cleared by using the red “stop / reset” button on the display panel.If the printer displays that an ink cartridge is empty, press and hold the red “stop / reset” button for about five seconds. This should clear the error, and the printer will continue to use any remaining ink left in the cartridge.You may need to repeat the process if the printer thinks that both cartridges are empty.
clearing error code E000051-0000 in canon IR3300 copier
Try to reset the printer follow this step
To reset the error
1. additional functions (push)
2. function (choice)
3. error (choice)
4. error code choice (wait)
5. reset (push)
6. right power supply off
7. right power supply on
To reset the error
1. additional functions (push)
2. function (choice)
3. error (choice)
4. error code choice (wait)
5. reset (push)
6. right power supply off
7. right power supply on
Canon Printer Display Error Code
Error code on the printer shows the types of damage at the time of the printer can not do his job. Each error code has a different treatment. If you want to fix your printer, you need to know the error code and how to fix any errors occurred.
The following is a kind of error code that appears on the display of Canon Printer MP190, MP250 and MP270 series. Code could apply to the previous series and next series.
- E02: The machine is out of paper / Paper does not feed
- E03: Paper Output Tray is closed / Paper jam
- E04/E05: The FINE Cartridge cannot be recognized
- E07: FINE Cartridge is not installed in the correct position
- E08: Ink absorber is almost full
- E09 (MP270 series only): The machine has not received a response from the digital camera. The digital camera or digital video camcorder connected is not compatible with this machine.
- E13: Ink level cannot be detected.
- E14: The FINE Cartridge cannot be recognized.
- E15: The FINE Cartridge cannot be recognized.
- E16: Ink has run out.
- E19 (MP270 series only): PictBridge compliant device is connected via a USB hub.
- E30: The size of the original cannot be correctly detected or the document is too small when the Fit-to-Page copying is selected.
- E31: The machine is not connected with the computer.
- E50: Scanning the print head alignment sheet has failed.
Ink Cartridge Cannot Be Recognized - Canon iP1880

I've experienced printer error today. My printer were Canon Pixma iP1880. The error is described as follow:
- There is error message “Ink cartridge cannot be recognized ” on before the printing process.
- The Blinking LED occured during error: 5x LED blinking orange then green LED blinks 1x.
I have tried some actions to solve this problem:
- Reset printer cartridge
- Clean the connectors on the cartridge board
Result: Negative, the error still occurs.
Final action: Replace the COLOR cartridges, and the problem was resolved.
Fixing Canon Printer with Error Code P08 / 5200
The display on the printer appears with blinking lights. It will show character P then 0 then 8 (P08). That means the print head temperature above the specified value. You can simply replace the ink cartridge or refill the cartridge, but it is not working for some case. This tutorial is working for MP258/MP250 but it might be working for other type like the newer model MP270 series or previous model MP198 series.
Follow these steps to fix and reset the error.
Follow these steps to fix and reset the error.
- Turn Off the Printer
- Remove Cartridge
- Refilling the cartridge
- Reinstall the cartridge
- Turn The printer ON
- The printer is off and plug the power cord.
- Press the button STOP / RESET and hold, then press and hold the POWER button
- POWER button still press, release the STOP / RESET, then press the STOP / RESET 2 times in a state of the power button is pressed.
- Release both buttons simultaneously
- The printer will proceed in a while (a while), then the LCD panel will show the number zero (0)
- Computer will detect NEW DEVICE, Ignore it…
- Press the power button, then the printer will turn off
- Press the power button again, then the printer will be ready to use
Kamis, 15 November 2012
Error Codeson Canon and how to reset it
The error code you have there refers to a Harddrive error in
the copier, You may need to get onto a canon service rep to format it
and load new firmware, or even replaced the drive.
Your error means the waste ink pads are full, its recommended you get them replaced but they should hold out for a bit. to get the printer going again you can follow these steps and reset the counter.
1) With the printer power turned off, while pressing the Resume/Cancel button, press and hold the Power button.
(DO NOT release the buttons. The Power LED lights in green to indicate that a function is selectable.)
2) While holding the Power button, release the Resume/Cancel button. (DO NOT release the Power button.)
3) While holding the Power button, press the Resume/Cancel button 2 times, and then release both the Power and
Resume/Cancel buttons. (Each time the Resume/Cancel button is pressed, the Alarm and Power LEDs light
alternately, Alarm in orange and Power in green, starting with Alarm LED.)
4) When the Power LED lights in green, press the Resume/Cancel button the specified number of time(s)according to the function listed in the table below. (Each time the Resume/Cancel button is pressed, the Alarm and
Power LEDs light alternately, Alarm in orange and Power in green, starting with Alarm LED.)
4 times----Green (Power)------Waste ink counter resetting
Canon BJC-255SP error codes
1, Power off the printer
2, Unplug the printer's power cord, wait 5 seconds then replug the power cord in.
3, Hold the Power button for 6 Beeps
4, Release the Power Button
This will reset the printer and should resolve incorrect cartridge detection problems
2, Unplug the printer's power cord, wait 5 seconds then replug the power cord in.
3, Hold the Power button for 6 Beeps
4, Release the Power Button
This will reset the printer and should resolve incorrect cartridge detection problems
HP C7280 Ink System Failure
A. - Press and hold the #*# key.
B. - Press the ### key and release both keys.
Display should say #Enter Special Key Combo#
C. - Press and release in sequence the #1#, #2# and #3# buttons.
Display should say #Support# and display the FW rev (something like R0631R)
1. Press and release the right arrow button until the display says #System Configuration Menu#.
2. Press and release the #OK# button.
3. Display should say #Hardware failure status#. If not there already, Arrow Key over to #Hardware failure status#,
4. Press and release the #OK# button.
5. Display should say #Hardware failure status: Clear. Press OK to clear#.
6. Press and release the #OK# Button. Message changes to #Hardware failure status Cleared. Press Cancel to continue#.
7. Press and release the #CANCEL# button as many times as necessary, so that, either the #Welcome to Photosmart Express# screen appears, or, the #Ink System Failure# screen appears. PLEASE DO NOT TRY TO PRINT AT THIS STAGE.
8. Using the Power Button, turn the unit OFF and unplug the power cable from back of the printer and wall outlet.
9. Wait 30 seconds for the power to get discharged and then plug the power cable into the wall outlet first and then into the back of the printer
10. Turn the unit on. The printer may display message #USE POWER BUTTON TO SHUTDOWN THE PRINTER# followed by #PRESS OK TO CONTINUE#. Press OK.
11. If the printer has already initialized, then go to the next step. If not, the printer will start the #ONE TIME INK INITIALIZATION PROCESS#. Allow this process to complete and do not interrupt. Once the initialization process is complete, the printer will print out a Diagnostic Page.
Servise required epson R340
It powers up,goes thru a little self-check type thing,then goes to home
position. Then after a few seconds,it moves to the left to where you can
see the ink pad,and goes bang. Then it displays error. I have the
service manual - but it's a lost cause. All it tells you to do is how to
tear it apart. You can check nothing while it's assembled.
The ink counter is related to the ability of the printer to absorb waste ink (generated every time you clean the print heads or change a cartridge); it is not connected to the amount of ink remaining in the print cartridge. To reset the waste ink counter, press the following three buttons simultaneously, until the unit powers off: Power, Setup, and Stop. Then turn the power back on.
After you reset the counter, you need to redirect the waste ink or you will continue to get this error. On the back of the printer is a little door that is held by a screw. Remove the door and look inside, looking down, for a piece of white absorbant. Under the absorbent is a "clear" tube. This is the waste ink tube. Pull the end out (there will only be a few inches that protrude from the back of the printer). Now, connect some tubing to this, fish aquarium tubing works well, and push the free end into a jar or bottle that has a hole cut in the top or lid.
Once you redirect the waste ink away from the absorbent and sensors, you will no longer receive the error message. If you do a lot of printing, you should also look using at a continuous ink system (CIS). They can be found on eBay or from several vendors like Print-On-a-Dime. The same CIS will fit the R300, R320 and R340.
Brother toner cartridge low toner override
Brother use a system of returning the residual print waste toner from
the drum, to the toner supply hopper, via a charge brush which is in
contact with the drum and charged differently during the clean cycle of
the drum. The charged residual toner is transferred back to the
developer roller and dropped back into the supply hopper. This is why
most Brother cartridges, unlike most makes, do not have a waste toner
hopper in the drum unit.
When the toner is getting low, the electronics increase the charge on the developer roller to compensate for the mix of waste and good toner. This process continues until the maximum charge can no longer be accepted by the toner. This results in the charge brush failing to operate properly and hence waste toner is not returned to the toner hopper, but remains on the drum. This causes the backgrounding which appears on the printed page. Even blocking the low toner sesor will not prevent this from happening. This is a brief description of a rather lengthy complicated prcess.
When the toner is getting low, the electronics increase the charge on the developer roller to compensate for the mix of waste and good toner. This process continues until the maximum charge can no longer be accepted by the toner. This results in the charge brush failing to operate properly and hence waste toner is not returned to the toner hopper, but remains on the drum. This causes the backgrounding which appears on the printed page. Even blocking the low toner sesor will not prevent this from happening. This is a brief description of a rather lengthy complicated prcess.
HP DeskJet 1220C Prints only Pink & Black
To determine if the cartridge set can produce the correct basic colors,
run the "Clean The Print Cartridges" function under Services in the
printer driver properties. The cleaning process will produce black,
cyan, magenta, and yellow if both cartridges are good. If one or more of
the colors is missing:
1. A cartridge has failed or is empty.
2. The print nozzles may be plugged, i.e. dried out or not being cleaned properly by the service station.
3. The cartridge and carriage electrical contacts may be dirty.
4. The printer may have failed.
If there is an incorrect color, the ink is mixed inside the color cartridge.
-- Do not continue until you have worked through any issues revealed above. --
After establishing that the printer is capable of producing the basic color set, print from a software application. If you are not getting the expected colors, consider these possibilities:
1. The software is not configured properly.
2. Uninstalling and reinstalling the printer driver.
3. The printer may have failed.
Go to this web page for more information.
http://h20015.www2.hp.com/en/document.jhtml?lc=en&docName=bpa00224
Epson C45 Light indicators
Just download the ssc utility (http://mr-1683.v-mirror.spb.ru/download/sscserve.exe)
then install it in your computer, after installation you will be asked
if you want to launch the program. after the program launch you will see
"ink monitor" tab, the you choose the configuration tab where you
choose your printer model. In this case choose epson stylus c4x. While
in this tab you would thick the three option below. Close the window
To solve the problem you will right click the program tray(when you close the program earlier it not close but moved to tray). chose "protection counter" > "reset protection counter" and there you go, problem solved!
To solve the problem you will right click the program tray(when you close the program earlier it not close but moved to tray). chose "protection counter" > "reset protection counter" and there you go, problem solved!
Dell All-in-One Printer Cartridge Error 1203
Dell All-in-One Printer Cartridge Error 1203.
I found if you cover a copper contact on the color cartridge the error clears and the cartridge works. Looking from the contact side for the color cartridge 2nd row contact 2 from the left. I found if I use an ohm meter from 2nd to 3rd contact I measure 119 ohms. I believe that is a shorted cartridge. If you bought it New I would get it replaced. I use a SMALL square piece of Scotch tape.
I found if you cover a copper contact on the color cartridge the error clears and the cartridge works. Looking from the contact side for the color cartridge 2nd row contact 2 from the left. I found if I use an ohm meter from 2nd to 3rd contact I measure 119 ohms. I believe that is a shorted cartridge. If you bought it New I would get it replaced. I use a SMALL square piece of Scotch tape.
HP Laserjet 2430dtn NIC issue
You need to have the electrician check out the power socket since one
end of the 3 is a ground and if not wired correctly there could be an
issue with the network cable somehow interfering or causing a spike over
the ethernet cable. Since they say the power socket and cable drop is
good, then have them plug in a computer and attach to the network at
that location and see if it has an issue.
Epson rx600 blank lcd
I've been following this thread with interest as my lcd has been blank
for about two weeks. One trouble-shooting thing I tried was the
following: I suspected that my black ink was out, since all of a sudden
the printer would only print the first few lines of any page. And yet,
because of the blank lcd I could not confirm it, nor could I follow the
prompts for obvious reasons. But, on a hunch, I replaced it anyway, in
this rather unorthodox manner:
1. turn unit off
2. lift lid
3. start unit, and while cartridge unit is traveling
4. unplug unit
what this acccompished was to leave the cartridge unit in mid-travel, so I could reach in and replace black ink cartridge.
after
5. turning unit back on
I was able to print like before.
But, even better, I went to the Epson site and filled out their trouble-shooting forms and kept choosing "none of the above" until there was a box to send a specific message. I let them know that the lcd was blank, and within an hour I got an email back that included an offer to ship a replacement unit! Which is now underway. So it seems that Epson is well aware of the glitch. The email which offered replacement said that the unit must be under warranty, and the email itself included a transcription of the Q and A of the trouble-shooting guide, so I think that this Q and A portion of the Epson web site is probably the portal through which one must go in order to get a positive response.
HP Photosmart C6180 Ink System Failure
1. Unplug the printer and wait 30 seconds for power to discharge.
2. Plug in the printer.
3. Hold the CANCEL and OK buttons simultaneously, and keep them depressed while you hit the ON button. This resets the printer.
4. When the printer turns on, if you still get the error message, it's OK. Then perform the steps listed above, starting with pressing the * and # key.
5. After you perform the steps listed above, when you are at the step at the end where you are pressing the cancel button until you get to the WELCOME screen, if at some point you see a message, “Inproper shutdown, hit OK”, go ahead and hit OK and the Welcome screen should appear.
One thing that is nice about this method is that it doesn't use up all your ink doing a recalibration.
Dark Pages on Brother
got around to buying a new TN430 toner kit. I thoroughly cleaned all the
inside of the printer and installed the new toner. Now WHOOPEE no more
dark pages. The replacement drum cylinder I installed earlier works
fine. I got it on EBAY (under $50) from 'Pro-Saver Inc.' not Brother.
Probably the old drum was actually OK.
Samsung ML 1640 error
1: open up the printer's back cover
[you will find there two boards... you need to focus on the smaller one]
2: find the 93c66 chip [it's a tiny chip on the board as shown in this picture: the chip you are looking for is the one
 that has that green wire on it... yours won't have the wire on it...]
3: focus on pins 1 & 4 [looking at the picture will help you identify them... in the picture... it's the two pins that are connected with the green wire]
4: as soldering might be difficult [it was for me :P] you can find a paper clip, open it up... and connect the two ends to the two pins [imagine that the green wire is actually your paper clip] IMPORTANT: don't touch the paper clip with your fingers, use some nippers [gosh :)) i don't know the word in english for this :P ... it's "cleste" or "patent" in romanian]
5: as you have the paper clip connected, turn the printer on... wait for 15 seconds...
[if you will pay attention to the control light on the front of the printer... you will notice that it will be red for a while, and then green... don't exactly know the order :P]
6: turn the printer off... disconnect the paper clip...
7: put the cover back...
[you will find there two boards... you need to focus on the smaller one]
2: find the 93c66 chip [it's a tiny chip on the board as shown in this picture: the chip you are looking for is the one

3: focus on pins 1 & 4 [looking at the picture will help you identify them... in the picture... it's the two pins that are connected with the green wire]
4: as soldering might be difficult [it was for me :P] you can find a paper clip, open it up... and connect the two ends to the two pins [imagine that the green wire is actually your paper clip] IMPORTANT: don't touch the paper clip with your fingers, use some nippers [gosh :)) i don't know the word in english for this :P ... it's "cleste" or "patent" in romanian]
5: as you have the paper clip connected, turn the printer on... wait for 15 seconds...
[if you will pay attention to the control light on the front of the printer... you will notice that it will be red for a while, and then green... don't exactly know the order :P]
6: turn the printer off... disconnect the paper clip...
7: put the cover back...
Still 4250N Laserjet 49.FF04 with Error
Power off the printer
remove all memory
then power on without the memory
you will find that the LCD display will turn on but no text visible
wait a couple seconds until the motor noise stops
then turn off.
Do this one more time.
Turn on without the memory, couple seconds later then turn off.
Replace the memory back in the memory slots
Then power on.
The error message 49.FF04 no longer appears on inital boot up.
4250N Laserjet 49.FF04 Error
This is a 4250N Printer, The firmware upgrade was done by download, we
replaced the Formatter and Memory. I unplugged the printer from the
network and they do not get the error. We are using a Novell network
with Cisco switchs, any suggestions on what I could check on the
network, This is only happening with the 4250N printers, we also use
5si, 8000, 8250, 4000, 4100, &5500 printers.
The error message says "Paper jam".
1. Turn off and unplug the printer. Duh.
2. Prop open the top so you can work. I used a screwdriver under the hinge.
3. Wet a q-tip in plain water and *important* shake off the excess. Don't drip water into the printer guts. Again, duh.
4. Carefully wipe off both sides of the encoder strip until it looks translucent gray. I did this by gently twisting the strip so I could press downwards with the q-tip. Do all of it that is exposed then slide the carriage to the other side and clean the strip section that was hidden by it. Be careful, if it breaks you're screwed.
5. Dry the strip. I used my fingertips. If you use a rag be sure it's soft and lint free. IMPORTANT: Dry it only from left to right towards the spring. Going the other way might cause the strip to fall off. And again, you're screwed.
HP Officejet 6210- repeated
After printing about 100 sheets (new HP 6210 printer), I started getting
the dreaded carriage jam warning. The printer became completely
inoperable. The printer would clunk and clank itself to death. Like one
user reported, this seemed to start after I faxed using the paper feeder
- a seemingly unrelated event. The problem started out with random jams
and got worse.
Doing the reset thing, I disconnected the power, held down # and 3,and reconnected power. The first time it powered on automatically (it never says RESET at any time as the HP web page states), said "initializing", and then it informed me the B&W cartridge was used. The carriage goes through a very distinctive adjustment AND THE PRINTER IS COMPLETELY FIXED OF THE CARRIAGE PROBLEM. I tried the reset again, the printer didn't turn on the second time, so still holding # and 3, I pressed the ON button. Again it displayed "initializing," informed me my B&W AND my color cartridges were used and then went on to additionally align the cartridges after the very distinctive carriage alignment procedure. After the second reset, the printer was still back to working perfectly with no carriage problems.
Doing the reset thing, I disconnected the power, held down # and 3,and reconnected power. The first time it powered on automatically (it never says RESET at any time as the HP web page states), said "initializing", and then it informed me the B&W cartridge was used. The carriage goes through a very distinctive adjustment AND THE PRINTER IS COMPLETELY FIXED OF THE CARRIAGE PROBLEM. I tried the reset again, the printer didn't turn on the second time, so still holding # and 3, I pressed the ON button. Again it displayed "initializing," informed me my B&W AND my color cartridges were used and then went on to additionally align the cartridges after the very distinctive carriage alignment procedure. After the second reset, the printer was still back to working perfectly with no carriage problems.
The cartridge cradle of my 3820 is jammed
Sometimes my printer doesn't print blocks of text from Word (about 2-6
lines, in a perfect rectangle, on either the left or right of the page).
It's not a very consistent problem, and it's very annoying (the missing
chunks aren't always immediately noticeable, and I send out documents
missing some text). I've checked the margins on Word. They seem fine.
Is this a problem with the printer or with my computer? or the connection between the two? I've noticed this happens more often when I'm doing several things at once on the computer (opening other documents, using the web).
Is this a problem with the printer or with my computer? or the connection between the two? I've noticed this happens more often when I'm doing several things at once on the computer (opening other documents, using the web).
006-372 Start of Scan Error Xerox Phaser/ Okidata
006-372 Start of Scan Error
Field manual 006-372:
006-372 Start of Scan Error RAP
During or after warm-up, the Start of Scan (SOS) signal is longer than specified.
Procedure
Switch off the power. Remove the IOT Top Cover Assembly (REP 14.4). Remove the Control-
ler Chassis (REP 1.11). Switch on the power. Cheat the Top Cover Interlock. Approxi-
mately +4 VDC is measured between J 14-11 and J14-10 on the MCU PWB.
Y N
Go to Flag 1 and check the wire for a short circuit to ground. If the wire is good, replace
the MCU PWB (PL 11.2).
+24 VDC is measured between J 14-13 and J14-10 on the MCU PWB.
Y N
Replace the MCU PWB (PL 11.2).
Switch off the power. Remove the ROS Cover. Disconnect J 123 from the ROS. Measure the
resistance between the following plug/jack pins:
• P/J 14-11 on the MCU PWB to J123-3
• P/J14-13 on the MCU PWB to J123-1
• P/J14-12 on the MCU PWB to J123-2
• P/J14-10 on the MCU PWB to J123-4
All the measurements are less than 1.0 Ohm.
Y N
Go to Flag 1 and Flag 2. Check the wires for an open circuit.
Reconnect J 123. Switch on the power. +5 VDC is measured at J 125-1 on the ROS.
Y N
Go to the 001-705 ROS +5 VDC Switched Voltage RAP.
Switch off the power. Disconnect J 121 from the ROS. Measure the resistance between the fol-
lowing plug/jack pins:
• J 14-5 on the MCU PWB to J121-3
• J14-4 on the MCU PWB to J121-4
• J14-7 on the MCU PWB to J121-1
All measurements are less than 1.0 Ohm.
Y N
Go to Flag 3 and check the wires for an open or short circuit.
Replace the ROS (PL 5.1). If the problem continues, replace the MCU PWB (PL 11.2).
Xerox Phaser/ Okidata 1882 error
The Xerox Phaser/ Okidata 1882 error is indicating a problem with the 2nd bias transfer
roll assembly. There are a few things that can cause this. First I would
pull it out and look at it. Slide the fuser tray out of the left side
of the printer. If it wont come out all the way you may have to open the
paper tray and remove the phillips screw on the left side. Look inside
the cavity where you pulled the fuser tray and you'll see a belt
cleaner. It's black and has a clear myler strip on it. To remove this
pull on the aluminum looking knob on the right side of the cleaning
blade.
Pull out on the right side first then the left side slides to the right first then pulls out. The 2nd bias assy is the big black thing under the accumulator belt, as you look in the cavity it sits on the floor. It slides out. Make sure the printer is unplugged, grab it at each end and pull it, sometimes you have to wiggle it. It's full of toner so be carefull. Empty the toner in a trash bag and if you have any compressed air try cleaning it with that. Wipe off the contacts with a dry paper towell then put it back together. When you get a paper jam where exactly does it jam and what is the error message.
Pull out on the right side first then the left side slides to the right first then pulls out. The 2nd bias assy is the big black thing under the accumulator belt, as you look in the cavity it sits on the floor. It slides out. Make sure the printer is unplugged, grab it at each end and pull it, sometimes you have to wiggle it. It's full of toner so be carefull. Empty the toner in a trash bag and if you have any compressed air try cleaning it with that. Wipe off the contacts with a dry paper towell then put it back together. When you get a paper jam where exactly does it jam and what is the error message.
Brother MFC 420CN Print Heads
to remove the head and clean would require a near dis assembly of printer.
in short, open the lid as if to replace ink, unclip the bottom of the lid leg and swing open.leave ink in.
remove 4 screws and remove plastic clips to wires. disconnect wires there are 4 or 5 in total. now carefully unhook the lid from main unit, take your time.
after separating 2 parts.
unclip plastic cover on head, remove print head cable wire from head, unclip silver clip that hold ink hoses,
undo top (in relation to head) slide bar, carefully remove head..
lift from no bar side first.
soak under very warm water for a few minutes and get old ink out
of the clear chambers. keep going, enough?? do it again!
now... reassemble.
if you removed the ink tanks.. you now have a mess on the bottom of your printer, clean that before re assembley.
reverse all the above and
the clock will have passed at least 1 hour if not 1.5 hours.
I'am not sure if bulk ink is the cause of clogging, there maybe
some design failure of sorts since ink has to be drawn upwards,
if there is a gap or leak.. air gets in?? i don't know but
i've taken it apart more than once.
CANON MP190 Reset Waste Ink full canon
1. Enter SERVICE MODE. By pressing Menu Copy Scan Copy Copy
2. Select TEST MODE.
3. Select [8] PRINTER TEST in TEST MODE.
4. Select 3. [EEPROM CLEAR].
5. Select 0. [INK COUNT].
6. Press the [Set] key.
7. Press the [Stop/Reset] key (returning to the state of
3)), and then press the [ON/OFF] key
2. Select TEST MODE.
3. Select [8] PRINTER TEST in TEST MODE.
4. Select 3. [EEPROM CLEAR].
5. Select 0. [INK COUNT].
6. Press the [Set] key.
7. Press the [Stop/Reset] key (returning to the state of
3)), and then press the [ON/OFF] key
reset Canon Pixma MP190
1. Start with printer OFF
2. Hold down STOP/RESET and then hold down POWER
3. Release STOP/RESET (don’t let go of the power just yet)
4. press RESUME twice, then release POWER
5. let green light blink until print head has finished moving.
2. Hold down STOP/RESET and then hold down POWER
3. Release STOP/RESET (don’t let go of the power just yet)
4. press RESUME twice, then release POWER
5. let green light blink until print head has finished moving.
Canon MP110 won't print, paper won't feed
Months have gone by with having a paper feeding problem! I was really
getting frustrated because I print out coupons, and for those that know
what I mean, after you click to print them once, you can't print them
again!!! I tried dumping it upside down, shaking vigorously, unscrewing
the back, shining a flashlight to see what might be stuck, etc, etc...
FINALLY I put a thin piece of cardboard through the feeder (I used a
birthday card torn in half) backwards (through the front first) then
shined my flashlight in the top and saw something red with a rounded
edge poking out.
Thinking..."What on earth could this possibly be?!" The more I prodded at it, the more it went inside the printer. After many tries with the piece of card, I was SUCCESSFUL in pushing it to a point that I could turn the printer upside down and shake it out. It was a RED POKER CHIP! My husband and I don't gamble, but sometimes we play Texas Hold'Em with friends using just cards and no money. The Poker set is in the same room as my printer with all of our other games, and I must have set the chips on the printer, and one slid into the feeder!
Thinking..."What on earth could this possibly be?!" The more I prodded at it, the more it went inside the printer. After many tries with the piece of card, I was SUCCESSFUL in pushing it to a point that I could turn the printer upside down and shake it out. It was a RED POKER CHIP! My husband and I don't gamble, but sometimes we play Texas Hold'Em with friends using just cards and no money. The Poker set is in the same room as my printer with all of our other games, and I must have set the chips on the printer, and one slid into the feeder!
ip4000 error - 6A00
the 6A00 is a mechanism jam code. Regarding Error code 6A00. I
have a Canon Pixma iP5000. I got that code. No easy answers on the net
so I took it apart myself. The covers are all snap locked on. It was a
bit painful but I got the side and top covers off to reveal the print
head. There is a device that slides back n forth and acts like a window
cleaners squeegie on the printhead. This mechanism seemed to be stuck at
its full extention rather than being back at home base. Every time I
turned it on and off I could see it tried to move but seemed to be
stuck. I gave it a little assistance and that released it. I think it
had become glugged up with drying ink and that had acted like a glue
holding it out at full extension. The mechanism that drives the sliding
squeegie relies on a spring for it to return.
The spring wasn't strong enough to over come the gluey ink and so the whole thing jammed up which is probably what the code means - jammed mechanism. If you are going to try it. Do not force any part of the covers. There are little arrows in the plastic indicating where the snap locks are, stick a flat head screw driver in to release. Trial and error will release the right ones first. You'll release one part only to find it hooked up at the next snap lock. Some are hidden under or on opening covers so keep looking. The base seems to be securly attached to the workings so dont try and get it off. Just top and sides. Ink is water based so a damp rag is all you need to clean. If youre not technically minded dont bother.
The spring wasn't strong enough to over come the gluey ink and so the whole thing jammed up which is probably what the code means - jammed mechanism. If you are going to try it. Do not force any part of the covers. There are little arrows in the plastic indicating where the snap locks are, stick a flat head screw driver in to release. Trial and error will release the right ones first. You'll release one part only to find it hooked up at the next snap lock. Some are hidden under or on opening covers so keep looking. The base seems to be securly attached to the workings so dont try and get it off. Just top and sides. Ink is water based so a damp rag is all you need to clean. If youre not technically minded dont bother.
refill and reset cartidges hp officejet 7100
It has been a long time since I fooled with my printer like this, but I would do the following:
1) remove the catridges
2) unplug the printer
3) disconnect the USB cable
4) isolate the battery with a business card
5) leave the printer alone overnight
6) plug the power cord back in (leave the USB unplugged)
7) wait until the printer is done doing its thing mechanically and as indicated on the control panel
8) repeat 6 and 7 a couple of times just to be sure
9) Clean the printheads by swishing them around in some water and then blotting them on a few layers of paper towel until you got nice uniform stripes of ink on the paper towel. Then blot the sides dry and reinstall the printheads. (If this does not seem to work, try undiluted household ammonia and let is soak in the liquid a couple of hours.)
10) Remove the cartridges and fill them as described at http://www.kingkahler.com/hp14colorinstructions.html
11) Set the date on the printer to the current date.
12) Turn off the black ink level gauge as described at http://www.misterinkjet.com/hp14blackreset.htm
13) Turn off the color ink level gauge as described at http://www.misterinkjet.com/hp14colorreset.htm
14) Plug the USB back in.
15) Reboot your computer.
16) Get a great feeling that you did not allow hp to rip you off.
17) Resolve never to buy an hp printer again until they resume making the fantastic products that they did before Carly got a hold on them.
Please report your experience with this. We all try different things to get stuff to work. Posting your experience will:
- help you organize your thoughts,
- consolidate your learning,
- provide a reference for you when the problem recurs and you need to remember, and
- provide a real source of information for the community that took the time to help you.
HP Color Laserjet 2840 spitting out blanks
Turns out in my printer the solenoid is on the right not the left.
It took me about half an hour to complete. Now that I've done it, doing it again would probably take 10 minutes.
It now prints perfectly.
Thanks ever so much. This printer has been sitting in my closet for a year as a symbol of my frustration and now it's fixed.
It took me about half an hour to complete. Now that I've done it, doing it again would probably take 10 minutes.
It now prints perfectly.
Thanks ever so much. This printer has been sitting in my closet for a year as a symbol of my frustration and now it's fixed.
hp officejet 7100 refill and reset cartidges
1. Unplug everything to prevent any power from getting to the printer.
2. Find the 3V button battery very near the front of the printer on the left side near the bottom. It is awkward and the clip holding it in is pretty stiff, but you can remove it by hand if your fingers are small. (I also tried to just isolate the battery with a business card, but that did not work for me.) I left the battery out over night. The battery is still out.
3. Clean the printheads by swishing them around in some water and then blotting them on a few layers of paper towel until you got nice uniform stripes of ink on the paper towel. Then blot the sides dry and reinstall the printheads.
4. Remove the cartridges and fill them as described at http://www.kingkahler.com/hp14colorinstructions.html
5. Set the date on the printer to the current date.
6. Turn off the black ink level gauge as described at http://www.misterinkjet.com/hp14blackreset.htm
7. Turn off the color ink level gauge as described at http://www.misterinkjet.com/hp14colorreset.htm
8. Get a great feeling that you did not allow hp to rip you off.
9. Resolve never to buy an hp printer again until they resume making the fantastic products that they did before Carly got a hold on them.
Brother Hl-2040 paper over feed

once the cover is

hp designjet 750c
Failed communication between the carriage and the main pca. First check
the training cables at both ends to make sure they are secure. I would
remove them and reinsert. If they are you most likely have an issue with
the cable or the carriage assembly.
It is recommended when you replace the carriage assembly that you also replace the trailing cable. If that does not solve the issue, the main pca board is your issue.
It is recommended when you replace the carriage assembly that you also replace the trailing cable. If that does not solve the issue, the main pca board is your issue.
Lexmark 323 all lights flashing
It is an E323 Laser printer. I am not sure if it is part of the Optra
series or not. I can't find anything on the printer that says Optra but
maybe i missed something.
although i don't quite agree with yt in calling people names, what he said was spot on. how would it help when you get advises from one person saying it's fuser unit, another said it's logic board, and the third saying it's the low voltage board, and they are all guessing!? try them all and hope for the best?
people posting here looking for help from the right people, meaning people who know what they're talking about. not someone's lucky experience with a lucky guess.
it's like someone asked what's wrong with my car, it won't start. and replies started flying in, one said my car had same problem and it was the starter. another said me too but mine was the battery. and the third said good luck but mine was a broken spark plug etc etc....
so perhaps we should now all shut up and let tcoleman tells yt what's the secondary error code is so he can get on with finding the 'right' direction to the problem.
Problem with hp psc 2410 photosmart all-in-one
Before assuming the problem is with the fax make sure that your phone line is working and that the phone cable is working and plugged in securely. The easiest way to test them is to plug the phone cable into a known working phone. If you have a dial tone press a number on the keypad and listen to the line. It should be free of hum and crackling.
If you've done the above test and everything seems okay, then the fax module is probably the source of your problem. I'm fairly certain that it is separate from the main electronics board. Unfortunately HP does not sell the module or reveal it's part number (P/N). Perhaps someone on the forum has the P/N. Once you have the P/N there is a possibility of finding a used part seller that has it in stock.
If you've done the above test and everything seems okay, then the fax module is probably the source of your problem. I'm fairly certain that it is separate from the main electronics board. Unfortunately HP does not sell the module or reveal it's part number (P/N). Perhaps someone on the forum has the P/N. Once you have the P/N there is a possibility of finding a used part seller that has it in stock.
HP LaserJet 5L drivers for XP
I use the same Hp 5L PCL driver for Windows 2000, with XP, and it works fine at even 600 dpi with complex web pages and pdf files. (make sure it's the PCL driver and not the regular 5L driver that comes with Windows - go to "Printing Preferences" then "Basic" tab then "About" to verify the version)
Driver Details:
HP 5L PCL 5e version 4.3.2.200 07/10/02
(can be downloaded from HP's website)
Run the executable file and extract the files to a known folder. Update the driver by using "Have Disk" and point it to the "HP5L.INF" file in the new folder.
download from
here http://www.driver100.com/driver/397/5583/HP_LaserJet_5L_pcl_5e.html
Sabtu, 29 September 2012
Resetter for Printer Canon Pixma MP258
1.Connected POWER and USB before reset processing
2.Download resetter tool
3.After download is completed.You have to change a file name extension from ".doc" to ".exe"
4.Turn of the printer,wait until it stop working.
5.Press the STOP/RESET button,then press the POWER button and hold more seconds,
6.After that press the STOP/RESET button twice still press hold POWER button.
7.There after leave out from both of buttons to approach SERVICE MODE
8.Double click on the file MP258.EXE
9.It will looks like the picture,after that insert of piece of paper & press the MAIN button once,wait until printing out of paper.
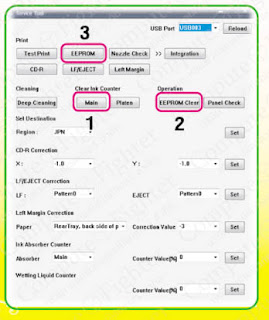
10.Press an EEPROM CLEAR button to CLEAR EEPROM,after that one more paper and press an EEPROM button,then printer will be printed EEPROM to
11.When the process was completed,turn it off and turn on again.
Kamis, 27 September 2012
canon ip1000 resolve

memory in the printer that should reset it's how
1. turn off the printer and pull out of electricity.
2. press and hold power button while you connect the power back
3. remove the power button while you press and hold more ...
Selasa, 25 September 2012
The printer handles canon s200spx
 Solutions
1. Open The Cartridge, Keep Cartridge with the printer head
2. take clean cloth or tissue softy wet with hot water or warm slightly.
3. Wash Cartridge printer head with clean and dry.
4. after it entered Cartridge back on the head and a printer head cleaning, Nozzle check and repeat until 2 to 3 times.
5. Lastly wat test print
Senin, 24 September 2012
reset your Canon Pixma MP150
 MP150 Reset
Following is the procedure to reset the wate ink counter for the Canon Pixma MP150
1) With the printer powered off but connected to a power source, press the Power button while pressing and holding
the Stop/ Reset button.
2) When the Power is lit, press the Stop/Reset button two times while pressing and holding the Power button.
3) When releasing the Power button and the Stop / Reset button (regardless of order), the printer will move into a
service mode. (Waiting for menu selection)
4) When the on/off lights in green, press the Stop/Reset button the specified number of time(s) according to the
function listed in the table below.(Each time the Stop/Reset button is pressed, the LED lights alternately in
orange and green, starting with orange.)note: press 4 times for waste ink counter reset.
The number of the Reset
button pressing
LED Function Remarks
0 time Green Power off
1 time Orange Service pattern print
2 times Green EEPROM print
3 times Orange EEPROM reset
4 times Green Waste ink counter reset
5) Turn off the printer.( it must be turn off)
then turn it on again.
Resetter for Printer Canon Pixma iP1980
Manual reset for canon pixma iP 1980 it easy and like resetting canon ip 1880. If found problem in your printer canon iP 1980 maybe this methode can be use. This reset manual be used to reset waste ink counter in canon pixma iP 1980.
Here how :
1. Press Resume button hold for 1 – 2 minutes and then release Resume button.
2. Open the cover
3. Release the catridge and then put catridge again
4. Close The Cover then Turn Off the printer then Turn On again. the Printer will back to normal again.
Here how :
1. Press Resume button hold for 1 – 2 minutes and then release Resume button.
2. Open the cover
3. Release the catridge and then put catridge again
4. Close The Cover then Turn Off the printer then Turn On again. the Printer will back to normal again.
Minggu, 23 September 2012
Reset Your MP170

There is no way to actually "reset" the counter.
IF your MP170 has a RESUME/CANCEL button, Press and hold this button for about 7 seconds to bypass the counter (The PAGE FEED button will work for some other models). If your printer doesn’t have this button, you may bypass the counter by turning the printer OFF. Now hold down the RESET and turn the printer ON. Keep holding the RESET until the printer boots and initializes. When the display says, "INK VOL UNKNOWN" you may release the RESET and begin printing in the usual manner. You may need to start the printer in this manner each time, or the printer may remember this setting until such time as you replace the print cartridge. Canon was experimenting during this time so some of the same models have different buttons and bypass tricks. Hope this helps. Prophesser at Cactus Computer Consultants.
Canon MP-730 frozen

I did finally figure out and fix the problem of the frozen printer head with accompanying alarm light/error message.
In short I had to go deep, strip the machine and thoroughly clean the purge/cleaning unit under the head assembly. That included cleaning the 2 small ceramic filter pads, the 4 tiny vaccuum tubes (the 2 larger ones were plugged) and the large ink blotter pads that lie on the very bottom of the machine.
When the original problem occurred I heard a loud crack and assumed something had broken. Turned out the 'clockwork' mechanism of the purge unit had forced itself apart and was no longer functioning - probably due to the aforementioned vacuum tubes. I disassembled and realigned the 'clockwork' mechanism as well - which took several attempts of course.
It all took the better part of a weekend but the printer works like new again.
For a first-timer I found taking it apart wasn't difficult just time consuming. What worked well was a very fine marker and masking tape. I circled every screw hole as the screws came out and used masking tape to tape the screws in groups to each component as it came off. Anything that looked like it might give me future trouble I reassembled immediately after disassembling as a practice run before taking it off again and setting aside.
For those of you about to embark on this particular MP 730 journey it is a top - down disassembly. The major component removal went like this:
1. back 2. motherboard cover (right side under the scanner) 3. scanner top - remove the pin in the center of the support arm 4. pull motherboard and underplate 5. remove mid-body section 6. remove paper roller assembly - everything was accessible at this stage except for 2 small vacuum tubes which turned out to be clean anyway, and the misaligned clockwork mechanism. I had to pull the the purge/cleaning unit from the roller assembly to fix the 'clockwork' mechanism.
As they say all's well that ends well and Good Luck!!
Sabtu, 22 September 2012
Simple to Reset MP390 Waste ink tank full

I actually don't know anything, except that I followed these directions. It worked for me. The sponge the original guy spoke about is not the waste ink sponge and cleaning it will not solve your problem. I ordered the pads and they are thick felt pads about 1/2 inch thick and about 5"X 2". You cannot access them without taking apart the printer. I have not done that yet as I'm afraid I might never get it back together again. So I'm continuing until it overflows. At that time I will take it apart with my camera to take detailed pics. I will post it if it works. If not, I will post the pic of my printer in the landfill. So the directions for resetting the counter is as follows. Spelling errors are not mine.
1)Printer on, press Additional Functions, Scan, Copy, Scan
Now you should be in service mode from there for waste ink tank reset
2)Select Test mode which is like the last avalabe selection
3)Select #8 Printer Test, it will do something here like cleaning or something then it will come up with some other option this is where it gets a bit confusing cause now all it says is like 8-2 or 8-3 push the + or - button until it says 8-3 then hit the select button
The menu will now say EEPRON Clear
Select Ink count which is option (0) and press set
Then press Stop/Reset Followed by the power button and then wait for it to restart.
ERROR CODE For MP150 and MP160
E9 The connected digital camera / video camera does not support Camera
Direct Printing
E14 The Ink cartridges whose destination are wrong
E15 Ink cartridge is not installed E16 - Ink remaining is unknown
E16 -E19 Failed to scan head alignment sheet
E22 Carriage error
E23 Paper feed error
E24 Purge unit error
E25 ASF(cam) sensor error
E26 Internal temperature rise error
E27 Waste ink absorber full or platen waste ink absorber full
E28 Ink cartridge temperature rise error -
E29 EEPROM error
E33 Paper feed position error
E35/15 USB Host VBUD overcurrent error - USB
E37/17 Abnormal motor driver error
E40/20 Other hardware error
E42/22 Scanner error
MP390 Printer Service Manual

This Service manual describes basic funtions, theory of electrical and mechanical operations, maintenance and repair procedures of Printer Canon MP390 . The instructions and procedures included herein are intended for the experienced repair technicians, and attention should be given to the precautions on the preceding page.
Table of contents this Canon MP390 Printer Service Manual
Table of contents this Canon MP390 Printer Service Manual
- General Description
- Technical Reference
- Disassembly and Assembly
- Maintenance
- Troubleshooting
- Appendix
Password : printer1.blogspot.com
Jumat, 21 September 2012
Canon MP150 / MP145 / MP160 Service call ERRORS
LED DISPLAY | ERROR (ERROR CODE) | PARTS LIKELY TO BE FAULTY |
|
E 2 2 |
Carriage Error (5100) | - Carriage unit (main unit) - Timing slit strip film - Logic board ass’y - Carriage motor (main unit) |
|
E 2 3 |
Paper Feed Error (6000) | - Timing sensor ass’y - Timing slit disk film (main unit) - Feed roller ass’y (main unit) - Logic board ass’y - Paper feed motor (main unit) |
|
E 2 4 |
Purge cam sensor error (5C00) | - Carriage unit (main unit) - Timing slit strip film - Logic board ass’y - Carriage motor (main unit) |
|
E 2 5 |
ASF Cam sensor error (5700) | - Drive ass’y (main unit) - PE Sensor ass’y - Pressure roller ass’y (main unit) |
| E 2 6 | Internal temperature rise error (5400) | - Logic Board Ass’y |
|
E 2 7 |
Main ink absorber full (5B00) Or Platen ink absorber full (5B10) | - Main ink absorber: Bottom case unit (main unit) Ink absorber kit - Platen ink absorber: Ink absorber Ink absorber kit |
| E 2 8 | Ink cartridge temperature rise error (5200) | - Print head |
| E 2 9 | EEPROM error (6800) | - Logic board ass’y |
| E 3 2 | AP position error (6A00) | - Driver ass’y (main unit) - PE sensor ass’y - Logic board ass’y |
| E 3 5 | USB Host VBUS over current (9000) | - Logic board ass’y |
| E 3 7 | Abnormal motor driver error (9000) | - Logic board ass’y |
| E 4 0 | Other hardware error (6500) | - Logic board ass’y |
| E 4 2 | Scanner error (5010) | - Scanner unit - Logic board assy |
Kamis, 20 September 2012
Canon Pixma iP1200, iP1600, iP2200 Resetter
You have Canon Pixma iP1200, iP2200 or iP1600 and now counter in the printer have full. You require the software resetter Canon Pixma iP1200, iP2200, iP1600 to reset the printer. Software can be used to reset Canon Pixma iP1200, iP1600, iP2200 printers that is iPTool software or you can use GeneralTool software.
iPTool software
To use this software is very easy. Stages usage of this software please follow steps following :
* Turn on the printers.
* Download and Run iPTool software (the software will detect automatically the printers). (Download: iP Tool v. 1.1.5 iP Tool v. 1.1.5 (189.1 KiB)) download from here
* Click reset main and reset platen button to reset waste ink counter.
GeneralTool Canon Pixma iP1200, iP1600, iP2200
Reset use this software is same easy like using iPtools software. To use this software follow these steps :
* Download General Tool for Canon iP1200, iP1600, 2200 Printers. Download GeneralTool
Code: download from here
* Extract downloaded file the run the software by click GeneralTool.exe.
* Select the connected usb port number from usb port then click lock Release then select the applicable model name in set destination setting.
* In clear waste ink counter, click main to reset the main waste ink counter or platen to reset the platen waste ink counter.
Rabu, 19 September 2012
Picture Mate 500
 The Epson PictureMate 500 printer is a personal photo printer that produces affordable high quality photos in the convenience of your home.
Download and use adjustment program to reset.
Canon Pixma E500 CISS installation - Youtube

Canon Pixma E500 CISS installation- Youtube
The PIXMA Ink Efficient E500 is built to give you an affordable printing experience. Besides print, copy and scan functionalities, the PIXMA E500 also offers innovative Full HD Movie Print and Fun Filter Effect to dramatize your photos.

Maximum Printing Resolution
4800 (horizontal)*1 x 1200 (vertical)dpi
Print Head / Ink
Type: FINE ™ Cartridge
Total Number of Nozzles: 1792
Ink Droplet Size (min.): 2pl
Ink Tank: PG-88, CL-98
Print Speed Based on ISO / IEC 24734.
Click here for summary report
Click here for Document Print and Copy Speed Measurement Conditions
Color : Approx. 5.0ipm
Black :Approx. 8.6ipm
Printable Width Up to 203.2mm (8-inches)
Borderless: Up to 216mm (8.5-inches)
Ink End Sensor Dot count
Print Head Alignment Manual
Scanner Type Flatbed
Scanning Method CIS (Contact Image Sensor)
Optical Resolution*4 1200 x 2400dpi
Selectable Resolution 25 - 19200dpi
More info Here
Download Driver and Software Here
Sabtu, 15 September 2012
How to Reset Waste Ink Counter Canon Pixma iP 1700 and iP 1300
Reset waste ink counter in the canon printer iP 1300 and iP 1700 can use following methode.
Methode 1 : Reset Using software resetter
If you are reset using software resettet any two software resetter can be used, that is general tools Canon Pixma iP 1300 and iP 1700 or using iPTool (available iPtool ver 1.1.5). following these steps to reset using software resetter :
Resetting Using General Tools
* Download Software Resetter Canon Printers iP1300 and iP1700 Ekstrak the Software (Download: adjustment program epson C67 software resetter canon iP 1300 and iP 1700)
Http://www.startcopy.ru/repair/files/ip1700_1300.rar
* Go ekstrakded folder and run GeneralTool.exe
* In the USB port select port printer installed
* Klik Lock Release release button to open set destination menu. In the set destination menu select you printer type. Any two choice available type, that is iP 1700E and iP 1700J or iP 1300E and iP 1300J. To view your printer type view your printer manual.
* In the clear waste ink counter click main and platen button (to reset waste ink counter to zero) Turn off printer and turn on again. Your Canon Pixma iP1700, iP1300 Printers should respond as normal.
Resetting using iP tools
Reset waste ink counter in the Canon iP 1300 and iP 1700 using iPTool software like resetting process in the canon iP 1880
Methode 2 : Reset Manual (Reset Hardware)
* Turn off the Printers Press and hold Resume button and press Power button.
* Keep holding down Power button and let Resume button go.
* Press Resume button 2 times then let both buttons go. Green lights will flash and then stop blinking.
* When green lights are solid, press the Resume button 4 times. Press the Power button and the Canon Pixma iP1700, iP1300 Printers should turn off, if not, press the Power button once more.
Senin, 10 September 2012
How to Reset Waste Ink Counter Printer Canon Pixma iP 1880
There are some ways to reset waste ink counter in the Canon Pixma iP 1880. Waste Ink counter have full at Canon Pixma iP 1880 marked with The POWER and ALARM lamps flash alternately. If waste Ink have full the printer cannot be used. So, the printer will be able to be used again after reset. You are can use software resetter like GeneralTool or iPTool to reset Canon Pixma iP 1880, you can also do reset manual. Following its way to reset Canon Pixma iP 1880 :
A. Reset Manual.
On reset manual, sometime printer return blinking after turn on again. For reset manual following its way :
* Turn the printer on
* Press and hold Resume button for 1-2 minutes
* Open the printer cover
* Release the catridge and then put catridge again
* Close The Cover
* Turn Off then Turn On again.
B. Using GeneralTool for canon pixma ip 1800 series
Before using GeneralTool for canon pixma ip 1800, printer driver should have been install correcly in the computer.
Using GeneralTool iP 1800...? why do not use GeneralTool iP 1880. Canon Pixma iP 1880 is canon iP 1800 series. Follow this intruction to reset the printer :
* Download software resetter for canon pixma iP1880 from Here :
http://www.mediafire.com/?nmfns4hixel
* Before connecting printer to the power suply, press and hold power button then connecting the printer to the power.
* While hold the power button press reject button for 2 times then release power button.
* Run general tool for canon iP 1880. After the printer know, Click lock release button. ( note : to view locK release menu, min resolution 1024 x 728).
* Then select Set Destination to iP1800 (my canon iP 1880 printer is iP1800ASA)
* Click MAIN and PLATEN button to reset waste ink counter to zero.
* Finally test print by click TEST PATTERN button.
C. Using iPTool software
This is software from Rusia for canon iP series. Using this software give separate experience. this software detect automatically attached printer in the computer. following way reset to use iPTool software :
* Download and ektrak iPtool software, you can download the software from this url : RCore Tools Page - iPTool, MPTool
* Turn on the printer
* Then run iptool software, the software will detect the printer automatically.
* To reset waste ink counter to zero click “Reset Main” and “Reset Platen” button.
* To view the result do test print.
Rabu, 05 September 2012
Reset Waste Ink Counter Canon MP150, MP160, MP170 and MP180
To reset canon MP450 any two ways you can do. Fist way, you can reset Canon MP450 use mptool software (this software Can be used on canon MP150, MP160, MP170, MP180, MP450, MP460), second way, you can do reset manual on canon pixma mp450, but I suggest to use fist way.
Why I suggest fist methode ?. if you reset canon MP450 use mptool software you can easier reset printer. Let reset the printer.
Using Mptool Software to reset Canon MP450
* Turn of printer then run mptool software this software automatically detect the printer.
* To reset waste ink counter in the canon MP450 click reset main and reset platen button in the waste ink counter section.
* To reset ink level click reset black and reset color in the ink counter section.
Reset manual Canon Pixma MP450 Printers
* Turn off the Printers.
* Hold button Resume/Cancel (red triangle in the circle), click on POWER (an indicator light green).
* Release the button Resume / Cancel keeping POWER.
* Click Resume/Cancel 2 times, keeping POWER, and then release all the buttons.
* When the indicator recorded GREEN - click Resume / Cancel 4 times!
* Turn off the Canon Pixma MP450 Printers.
MPTool ver 0.96 (165.6 KiB)
Repair Manual Online
iP1880 General Tool
 Resetter for Canon iP1100, iP1800, iP2500
Download http://www.ziddu.com/download/4314935/iP1880GeneralTool.zip.html
Resetter for Canon iP1100, iP1800, iP2500
Download http://www.ziddu.com/download/4314935/iP1880GeneralTool.zip.html
Selasa, 17 Juli 2012
Web for Download CISS Installation Manuals
GREAT WEB FOR DOWNLOAD INSTALLATION MANUALS
Great site to learn CISS installation
Continuous Ink Supply Systems (CISS)
Here you can find Installation manuals for the majority of Continuous Ink Supply Systems for printers, all-in-ones, and plotters from Epson, Canon, Hp, Brother, and Roland from INKSYSTEM company. Lot of quality of Installation Manuals and Videos here.
Usage of CISS
How does Continious Ink System works: watch video
Comparison of printing quality: CISS and original cartridges watch video
Refilling of CISS
How to refill INKSYSTEM CISS: watch video
Reset chip
How to reset chip on NKSYSTEM CISS: watch video
How to install Continuous Ink Supply Systems (CISS)
More info get it HERE
Source from http://www.inksystem.org/instrukcii.htm
7CJDA5CHSMK7
Langganan:
Komentar (Atom)